Here are a few steps that should help you do the hard work easily:
NOTE:You have to be logged into an Administrator account in both Windows XP and Windows 7 computers.
Step 1:
First of all,make sure both computers are members of the same Workgroup which by default is named "WORKGROUP".
To verify this open "System Properties" by pressing "Windows" key +"Pause|Break" key or type sysdm.cpl in Run Dialog for XP or the START menu search box in Windows 7 and look in the "Computer Name" tab.
 If workgroup are not same for both Xp and Windows 7 computers then do the following on one or both the computers:
1.Click on the “Change” button to rename the computer name or the Workgroup name.

2. Reboot your computers for the change to be applied.
Step 2:
From now onwards,lets consider only the Windows 7 setup.
In the Windows 7 computer go to :
Control Panel > All Control Panel Items > Network and Sharing Center and
then click on "Change advanced sharing settings"
Now,verify the following settings under "Advanced Sharing Settings" for the Home or Work and Public profile.
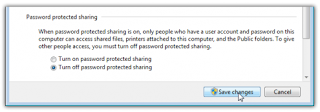
 To allow anyone to have access to the public shares,then you should select the "Turn off password protected sharing" located towards the bottom of the above list.
But,if you wish to keep password protection enabled,then make it sure that there is a log in account for the other XP users and they have a password for logging into those accounts.

Step 3:
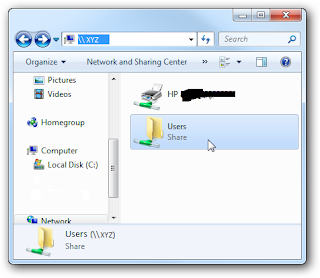
Now go to "Network" in Windows 7 and you should see your XP machine with name XP-PC as well as Windows 7 computer which in this case is XYZ.
 If you are unable to see the XP computer then check your network settings and also check your firewall settings,in both XP and Windows 7 computers.
Step 4:
We are concerned about the "File sharing" part.
So,now double click on the Windows 7 machine icon under Network. Here you can see the printer connected to my Windows 7 machine is shared and also the Users Folder.

Double click on the Users folder and then go into Public folder to see the shared folders on your Windows 7 computer.Here you can create folders to be accesible to other users.
Step 5:
In your XP machine, open "My Network Places" to find the folder shared on Windows 7 computer(with name XYZ).
Now,if you double click on the shared folder ,then you will see the list of folders available in the Public folder of Windows 7 computer.
If you have password protection enabled,then you will have to type in the username and password of the user account on the Windows 7 computer.
That's all for now!

Really good tips guys
ReplyDeleteWeb Designer in Bangalore